


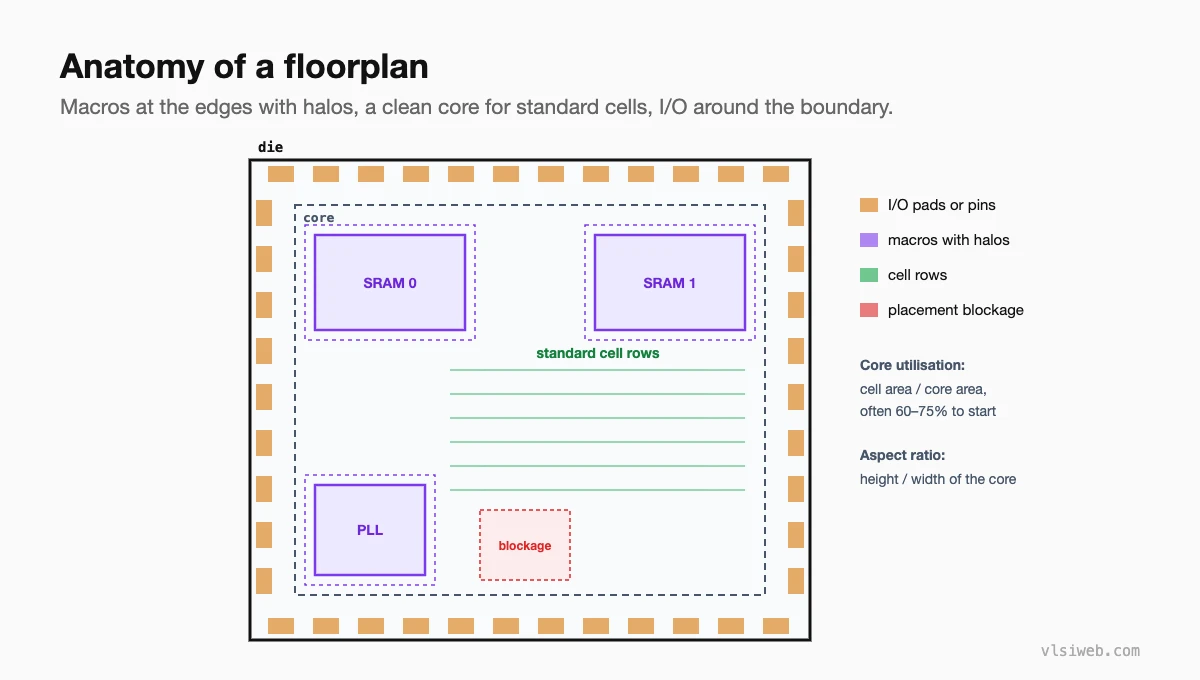
The short answer: Floorplanning sets the physical framework for the whole block: die and core size (from target utilisation and aspect ratio), placement of macros such as memories and PLLs, I/O pads or block pins, placement blockages and halos, and often the power grid. A good floorplan keeps macros at the edges with their pins facing the core, leaves clean channels for routing, and follows the data flow between blocks. Most timing and congestion problems later in the flow can be traced back to the floorplan.
I think of floorplanning as the most important step in physical design. You can’t fix a bad floorplan with clever placement or routing; you can only fight it. This post covers die sizing, partitioning, macro and I/O placement, pins and blockages, and combines five older posts on those topics.
- What a floorplan contains
- Sizing the die and core
- Partitioning a chip
- Macro placement
- I/O and pin placement
- Blockages and other floorplan objects
- How I check a floorplan
Table of Contents
Part 1: What a floorplan contains
Part 2: Sizing the die and core
- Core utilisation = standard cell area ÷ core area. Starting around 60–75% leaves room for buffering, CTS and routing; dense, well-behaved logic can go higher.
- Aspect ratio is usually close to 1 unless the top-level floorplan dictates otherwise.
- Core-to-die spacing leaves room for the I/O ring or power rings.
- For a block inside a chip, the top-level team usually gives you the shape and pin locations.
Part 3: Partitioning a chip
Large chips are split into hierarchical blocks that are implemented separately and assembled at the top level. Good partitions follow the logical hierarchy, keep tightly connected logic together, and have registered interfaces so timing between blocks is easy to budget. Each block gets a shape, pin positions and timing budgets for its inputs and outputs.
Part 4: Macro placement
- Place macros at the edges or corners of the core, leaving a large contiguous region for standard cells.
- Orient them so their pins face the core, close to the logic they connect to.
- Leave channels between macros wide enough for routing and power straps, or block them completely so cells don’t get trapped there.
- Add halos (keep-out margins) around macros to avoid congestion and spacing violations at their pins.
- Follow the data flow: a memory feeding a pipeline should sit next to it.
Part 5: I/O and pin placement
At chip level, I/O pads ring the die, with power and ground pads spread around to supply the core. At block level, pins are placed on the boundary to match the neighbouring blocks, on the right metal layers, and spread out so routing doesn’t pile up at one corner. Feedthrough and clock pins usually get special attention.
Part 6: Blockages and other floorplan objects
| Object | Purpose |
|---|---|
| Hard placement blockage | No cells at all, e.g. narrow channels |
| Soft placement blockage | Only buffers or optimisation cells allowed |
| Partial blockage | Limit cell density in congested areas |
| Routing blockage | Keep certain layers free over an area |
| Halo / keep-out | Space around macros |
| Endcap and well-tap cells | Required by the technology at row ends and at fixed intervals |
Part 7: How I check a floorplan
- Run a quick placement and look at congestion and timing before committing.
- Check macro pins are accessible and there’s no trapped area.
- Check the power grid reaches every macro and region (see power planning).
- Review the flight lines between macros and logic: long, crossing lines are a warning sign.
Practise this on VLSI Forge
I built VLSI Forge so you can write RTL in your browser, run it on a real simulator and check every signal in the waveform. Free, nothing to install.
Physical Design problems · Static Timing Analysis problems
Previous in my physical design series: PD inputs: PDK, libraries and tools. Next: Power planning.
FAQ
What is floorplanning in physical design?
The step that defines the die and core size, places macros and I/O, and sets up blockages and the power grid before standard cells are placed.
What is core utilisation?
The ratio of standard cell area to core area. Typical starting values are around 60–75%.
Why are macros placed at the edges?
To leave a large continuous area for standard cells and keep routing channels clean, which reduces congestion and timing problems.
What is a halo in floorplanning?
A keep-out margin around a macro where standard cells can’t be placed, reducing congestion and rule violations near its pins.
